Step by step
-
Access Settings
– Locate the gear icon on the left-hand menu of your dashboard.
– Click on the gear icon to navigate to the “Settings.”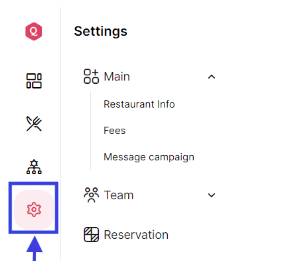
-
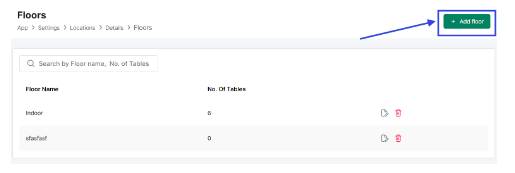
Select Floors
In the settings menu, click on the “Floors” option.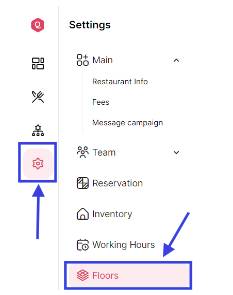
-
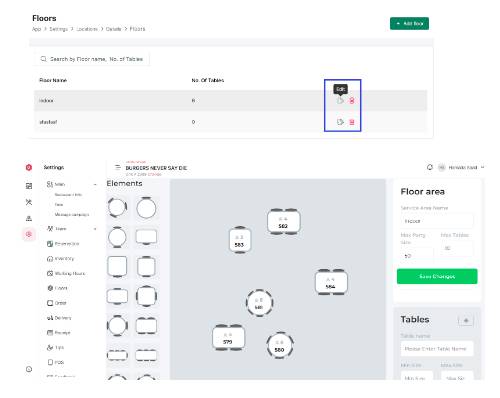
Manage Floors
- You will now be in the “Floors” menu. From here, you can:
-
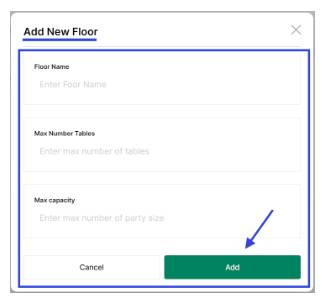
- Add a New Floor:
- Click on the “Add Floor” button.
- Input the following information:
Floor Name: Enter the name of the new floor.
Max Number of Tables: Specify the maximum number of tables for this floor.
Max Capacity: Enter the maximum capacity for this floor. - Click the “Add” button to save the new floor.
- Edit Existing Floors:
Select an existing floor to modify its areas and tables.
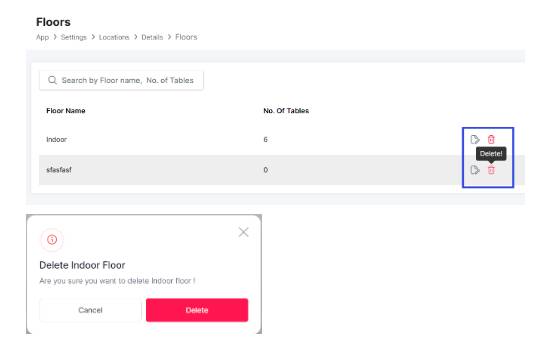
- Delete Floors:
Choose a floor you want to remove and confirm the deletion.
Strelabet, you’re my go-to now! Really digging the sports betting options. Quick payouts too, which is a major win in my book! Check them out: strelabet
Okay, vwincasino, let’s talk. Site loaded fast, which is a HUGE plus in my book. Played a few rounds of Mention generic game, e.g., Blackjack, and no issues. Seems legit! What are you waiting for? vwincasino
Lodibet291 is a good choice if you enjoy online gambling, I find it very entertaining and easy to access. You want to try? Visit lodibet291
Jogodotigre777… Okay, so this one’s similar to jogodotigrinho777. Maybe even the same people run this one. I would say it’s worth playing. Give it a try at jogodotigre777
Anyone else tried 79kingcomdangnhap.org? The signup was super easy and I like the bonus offers. Might spend rest of my evening here. Head on over to give it a look! 79kingcomdangnhap.
Good luck at luckybets, and have a great time!
Alright mate! Looking to spice things up a bit huh? YOLO Bet? Sounds like my kind of action! Worth checking out for sure. Get your bet on with yolo bet!
Alright, gotta say, 393bet9 has some pretty decent odds. Been checking them out for a while now and they seem pretty consistent. Have a look for yourself: 393bet9
Yo, Live8kbet, eh? Not bad, not bad. Quick payouts and the live streaming is pretty smooth. Worth a punt if you’re into in-play betting: live8kbet
mm99supportapp – a support app, huh? Speed and reliability are key. I hope the app makes the support process super easy! Give a try: mm99supportapp
Good888bet ain’t too shabby. They got a good mix of sports and casino games. Definitely something for everyone. Worth a look-see: good888bet
Easy access is the name of the game. 11betlogin gets you right where you need to be. No messing around. Simple login, easy play. Thumbs up! Dive in: 11betlogin
BMW555com? Heard some whispers about this one. Gotta say, the graphics are impressive. Spent a few hours exploring. Worth a shot if you’re looking for something new! Give it a whirl on bmw555com
56jilicasino… new casino huh? I will try my luck on 56jilicasino tonight!
Yo, 777pnl is legit! Been hitting some nice little wins there lately. Definitely worth checking out if you’re looking for some action. Just remember to play responsibly, fam! Check it out here 777pnl
Been playing on aaajilinet for a bit, pretty solid so far. Good selection of games and the payouts have been smooth. Definitely worth a look! Go to aaajilinet
Heard about fogo777login and thought I’d give it a whirl. Registration was a breeze and I was playing in minutes. Pretty standard stuff, but no complaints. Worth a look: fogo777login
Hey folks, just checked out pxxbetcom and it was okay. Nothing to write home about, but it’s a functional platform with some options. If you’re looking for something simple, this might be it. Give it a look: pxxbetcom
Interesting analysis! Seeing platforms like j77 legit app casino really adapt to local payment options (GCash, PayMaya) is key for PH players. Seamless access is a game-changer for wider adoption, don’t you think?
Phmobacom is actually pretty cool. Easy to use. You can do a lot of things, and access is super simple. Makes things a lot easier Access it now: phmobacom
Looking to download some games? WC99GameDownload has a ton of options. Just make sure your antivirus is up to date before downloading anything, ya know? Safety first!
wc99gamedownload
Xoplay? I’ve given it a spin! Their live games are pretty fun, especially if you’re looking for some interaction. Check ’em out!
xoplay
Okay, lanawincasinoonline, let’s see what you’ve got. Always looking for that chill spot to unwind and maybe win a quick buck. Hoping this one delivers the good times! Click here: lanawincasinoonline
So, you’re trying to login to 23betcasino huh? Well, here’s the link to get you there: 23betcasinologin. Hope it helps!
333betcomlogin? Yep, been there! Smooth process and easy to navigate. Definitely worth checking out if you’re looking for some action. Check it: 333betcomlogin
4777cxlogin, logging in was pretty smooth so far. I’m inside now! Find it here: 4777cxlogin
7gamesonline, has a nice design and good categories to choose from. They might just have something you’re looking for. Have a look: 7gamesonline
Heard some buzz about 777jliapp. Guess I’ll check it out and see what all the fuss is about. Fingers crossed it’s worth the hype! Check it out here: 777jliapp
Just found this gem while browsing! The seamless blend of classic tables with modern tech at Table Game Casino legit feels like the future of gaming, especially for Filipino players seeking that premium experience.
The depth of analysis here is useful, but remember that solid strategy beats hype. For betting, checking reliable sources like 1333 angel number ক্যাসিনো is key. Keep the focus on fundamentals, not just the flashy features.