Step by step
-
Find the “working hours” option
– Click on the settings “gear icon”
– Click on “working hours”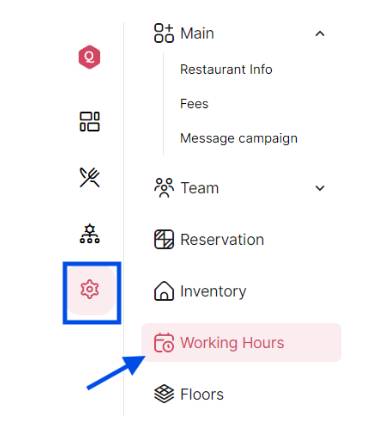
-
Set Your Working Hours
Once you’ve found the working hours section, you’ll see options to set your start and end times. Use the sliders, dropdown menus, or text input boxes to define your work hours.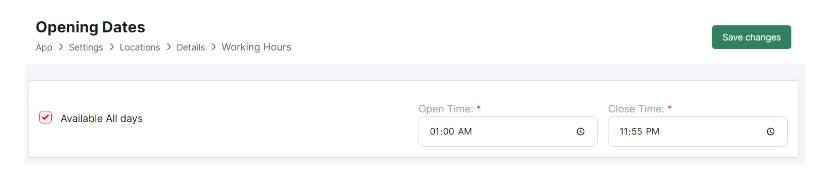
-
Configure Working Days
In addition to setting your working hours, you can specify the days you work. This allows you to customize your schedule according to your needs and preferences.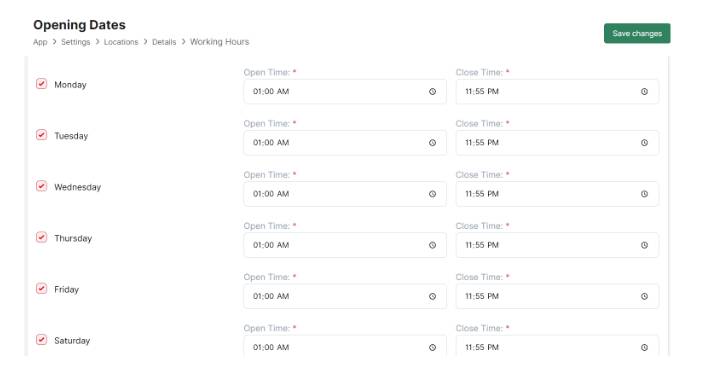
-
Save Changes
After configuring your working hours and days, look for a button or link labeled “Save changes” to apply the changes. Make sure to click this button to confirm your schedule.Verify Settings
Once you’ve saved the changes, verify that your working hours are set correctly. You can do this by returning to the account settings section and reviewing your working hours and days. -
Adjust as Needed
If you need to adjust your working hours at any time, simply repeat these steps and make the necessary changes in your account settings. -
Ready to Work!
With your working hours set up on Qwizeen, you’re ready to make the most of your time on the platform. You can now focus on your learning and professional development during your designated working hours. -
Keep Your Settings Updated
It’s important to review and update your working hours on Qwizeen as needed. If your working hours change or if you want to adjust your availability, make sure to reflect these changes in your account settings.
By following these simple steps, you can easily set your working hours on Qwizeen and manage your time effectively while using the platform for your learning and professional development.
Yo, Crazywinph is my go-to spot! Good games, easy to navigate. Been winning some serious dough lately! Check it out crazywinph.
That’s a solid point about player form impacting outcomes – often overlooked! Seeing tools like Text to Video democratizing content creation is exciting too, making analysis more accessible. Great article!
Just discovered Novapattigame and I’m hooked! So much to explore and tons of ways to win. Seriously, check it out novapattigame.
555wincasino is pretty solid. Wide variety of games to choose from, and I haven’t had any issues with withdrawals. The website is easy to navigate. Give them a spin: 555wincasino
Xosobaclieu, huh? Never heard of it before today. Took a punt, why not! The games are surprisingly fun. Just be careful and play responsibly, yeah? Good luck out there: xosobaclieu
Mxwin27 is worth a look. There’s plenty to do to keep me busy! I like that the site is well set up. I’m hoping to have a nice win soon. mxwin27
Alright, checked out c999game! Seems like a decent spot to try your luck. Nothing groundbreaking, but worth a look if you’re bored. Give c999game a whirl and let me know what you think.
Yo peeps, 88clbgame is where it’s at! Loads of different games to keep you busy. I especially liked the selection they got. Hit them up here 88clbgame!
Taya01’s where it’s at, fam! Smooth interface and a good selection of games. Plus, their customer service is actually helpful, which is a major plus! Don’t sleep on it! taya01
Доставка точная, композиция стильная. Класс!
доставка цветов
При выборе серверов стоит учитывать xrumer proxy https://www.olx.ua/d/uk/obyavlenie/progon-hrumerom-dr-50-po-ahrefs-uvelichu-reyting-domena-IDXnHrG.html, которые обеспечивают анонимность.
Y666Download – tons of cool apps and games to find here. A good spot to check if you like gaming!
y666download
18Jili is pretty popular right now. Got a decent selection of slot games, if you’re into that kinda thing. Worth a look, maybe?
18jili
555uu. Not too sure about that site, but it looks like a fun place. As always, gamble responsibly!
555uu
The platform merges classic table games with digital innovation perfectly. For seamless access on any device, try Table Game Casino apk to experience the next evolution in Filipino online gaming excellence today.
Honestly, the onboarding process seems straightforward, but comparing it to other sites is key. For a real comparison, check out 49bet ভিআইপি; it gives a better user feel than just reading the steps.