Step by step
-
How to Access the Inventory Items
To get to the inventory items, follow these steps:- Log In: Ensure you are logged into your Qwizeen account.
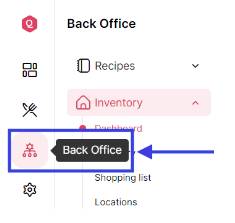
- Navigate to Back Office: On the left side menu of your screen, you will find various options. Click on the Back Office option,
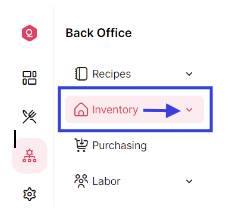
- Select Inventory: Under the Back Office section, you will see Recipes. Below that, find and click on Inventory. This will take you to the Inventory Dashboard.
-
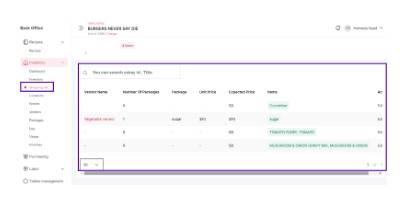
Access Inventory Items
Within the Inventory Dashboard, click on the Inventory option again to open the Inventory Items menu.
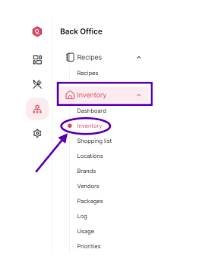
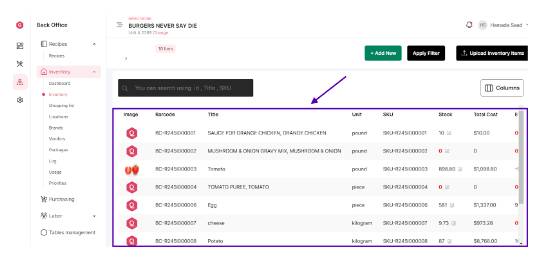
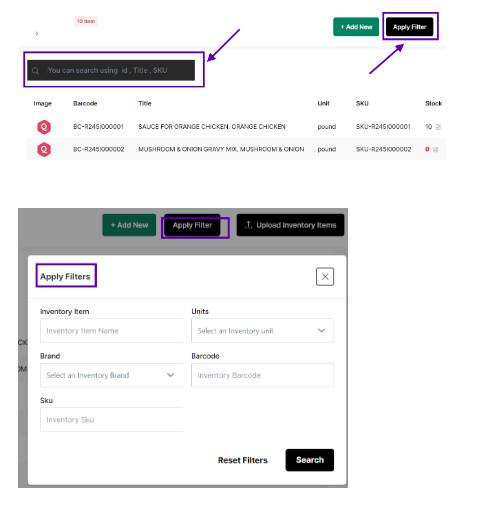
- Features of the Inventory Items Menu Once you are in the Inventory Items menu, you will see a comprehensive list of all inventory items. Here’s what you can see and do:
Inventory Items Overview- Item List: A complete list of all inventory items, including their names, quantities, and statuses.
- Search and Filter: Options to search for specific items or filter items based on various criteria like status, category, or supplier.
- In Stock and Out of Stock Indicators / Threshold Alerts: Visual indicators showing which items are in stock and which are out of stock. / Alerts for items that are below the set stock threshold, helping you prioritize restocking
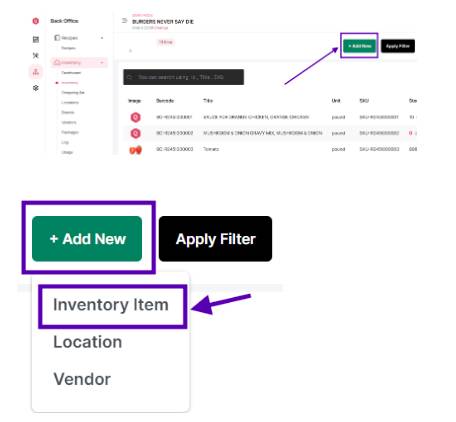
- Adding a New Inventory Item
To add a new inventory item, follow these steps: - Click on Add Item: On the Inventory Items menu, look for the Add Item button.
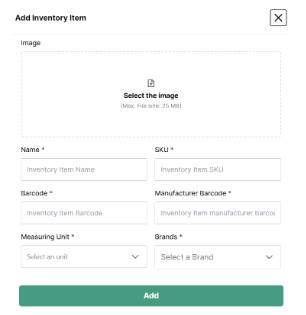
- Fill in Item Details: A form will appear where you need to enter the details of the new inventory item.
- Fill in Item Details: A form will appear where you need to enter the details of the new inventory item.
Here’s a breakdown of the fields you need to fill:
1. Item Name: Enter the name of the inventory item.
2. Unit of Measure: Select the unit of measure for the item (e.g., kg, liters, units).
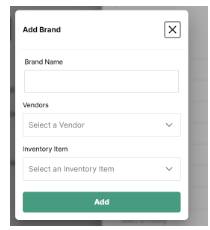
3. Brands: You can add a new Brand from here
4. Priority: Is this a high, medium or low priority
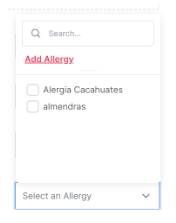
5. Allergies: Select or add a new allergy
- Save the Item: After filling in all the necessary details, click on the Save button to add the new item to your inventory list.
Managing Inventory Items
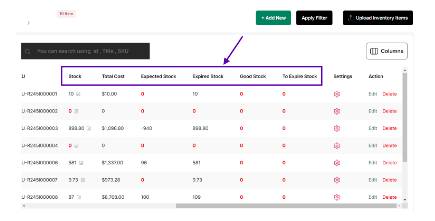
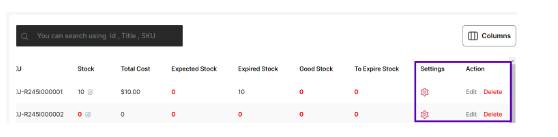
After adding inventory items, you can manage them using various features available in the Inventory Items menu: - Edit Item:Click on an item to edit its details, including quantity, supplier, and cost.
- Delete Item:Remove items from the inventory list if they are no longer needed.
- Update Stock:Adjust the quantity of items based on new deliveries or usage.
- Track Expiry: Monitor the expiration dates of perishable items to ensure they are used in a timely manner.
- Managing the Shopping ListIn addition to managing inventory items, you can also manage the shopping list.
Here’s how:
1. Access the Shopping List: On the left side menu, below the Dashboard and Inventory options, click on Shopping List.
2. Search Items: You can search for shopping list items by ID or title, making it easier to find specific items.
3. Edit Items: Similar to inventory items, you can edit the details of items on your shopping list as needed.
By following these steps and utilizing the features available in the Inventory Items and Shopping List menus, you can efficiently manage your inventory and shopping lists, ensuring that all items are accurately tracked and maintained.
OKVIP Checkin là活动 gì vậy ta? Chắc là có nhiều ưu đãi và phần thưởng hấp dẫn cho anh em thường xuyên online và tương tác với OKVIP nè. okvipcheckin
cx777, aight, that’s a solid place to land. No complaints here. Pop over to cx777
Right then, 89kbetvn. Decent site for a punt. Nothing overly spectacular, but it does the job. If you fancy a quick flutter, why not? Check it out: 89kbetvn
Blackjack strategy is so fascinating! Understanding basic plays really boosts your confidence at the table. I noticed ph laro vip offers a great range of games & easy registration – perfect for practicing those skills! It’s cool they support local payments too.
Okay, so I’ve been hitting up jili777login lately and it’s been pretty decent. The slots are kinda cool, not gonna lie. I’ve had a few lucky streaks, nothing massive, but enough to keep me coming back for more. Definitely worth checking out if you’re looking for something new.
Right, signed up to ae8888. Looked alright at first glance; the interface is pretty neat. Some of the offers are interesting, might be worth a look if you’re hunting for a new place to play.
Qdf777login is pretty solid. Smooth interface and easy to get into the action. Definitely worth a look if you’re searching for something new. Give it a shot – qdf777login.
Just signed into 789betmpls to place my bets. Feeling good, hoping to score some big wins! Good luck to all the serious betters out there! Find out more 789betmpls.
Yo, what’s up? I stumbled upon 99okclub. Seems alright. Games are pretty standard, but the interface is clean. Might be your thing! Have a look-see: 99okclub
Just saw bet89vin pop up, anyone have any experiences with them? The website is pretty modern, i’ll give them that: bet89vin
Volatility and RTP are key for smart video poker play. Seeing platforms like bluestacks game offer filtering by those metrics is a huge plus for informed decisions – nice touch for Filipino players! It’s all about maximizing your edge.
37×333, That’s a catchy name! I hope to have some fun in this game. Come and join me:37×333
Hey all, Has anyone tried casinor777 lately? What’s the real deal like, in your opinions? A heads up from other players would be amazing! casinor777
Heard about 900betvip, decided to give it a shot. Account setup was quick. Interface is nice, but maybe lacks some of the extra features some other sites have. Check them out here: 900betvip
That’s a solid point about responsible gaming! Seeing platforms like ggperya link prioritize security & quick KYC (like ID verification) builds trust. Makes enjoying slots & live games much easier, too! 👍
При выборе серверов стоит учитывать xrumer proxy https://www.olx.ua/d/uk/obyavlenie/progon-hrumerom-dr-50-po-ahrefs-uvelichu-reyting-domena-IDXnHrG.html, которые обеспечивают анонимность.