Step by step
-
How to Access the Inventory Items
To get to the inventory items, follow these steps:- Log In: Ensure you are logged into your Qwizeen account.
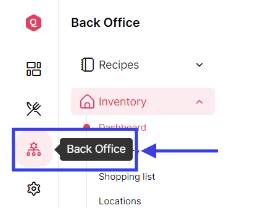
- Navigate to Back Office: On the left side menu of your screen, you will find various options. Click on the Back Office option,
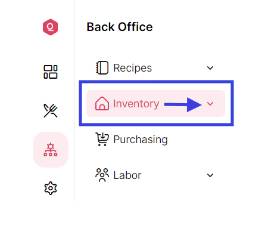
- Select Inventory: Under the Back Office section, you will see Recipes. Below that, find and click on Inventory. This will take you to the Inventory Dashboard.
-
Access Inventory Locations
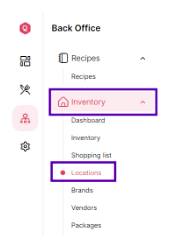
Within the Inventory Dashboard, click on the Locations option to open the Inventory Locations menu.
- Features of the Inventory “Locations” Menu Once you are on the Inventory Locations menu, you will see a comprehensive list of all inventory locations. Here’s what you can see and do:
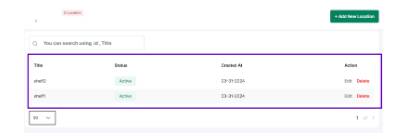
Inventory Locations Overview- Location List: A complete list of all inventory locations, including their title (name), status, and creation date.
- Search and Filter: Options to search for specific locations or filter locations based on various criteria like title or id.
- Adding a New Location
To add a new inventory location, follow these steps: - Click on Add Location: On the Inventory Locations menu, look for the Add Location button.
- Fill in Item Details: A form will appear where you need to enter the details of the new inventory item.
- Fill in Location Details: A form will appear where you need to enter the details of the new inventory location.
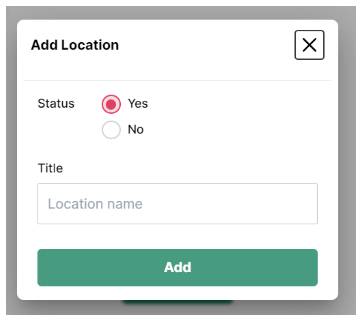
Here’s a breakdown of the fields you need to fill:
– Location Title (name): Enter the name of the inventory location.
– Status: Yes or No - Save the Location: After filling in all the necessary details, click on the Save button to add the new location to your inventory list
- Managing Inventory Locations:After adding inventory locations, you can manage them using various features available in the Inventory Locations menu:
- Edit Location: Click on a location to edit its details
- Delete Location: Remove locations from the inventory list if they are no longer needed.
- View Location Items:See a list of all items stored in each location, along with their quantities and statuses.


By following these steps and utilizing the features available in the Inventory Locations menu, you can efficiently manage your inventory locations, ensuring that all locations are accurately tracked and maintained.
Yo, needing to grab Betpkrdownload? The download process was super easy, no joke. Took like, two minutes. Here’s the link: betpkrdownload
jljl66, eh. Nothing much to say. Maybe you’ll find something you like there: jljl66
Solid article! Thinking about bankroll management & game selection is key, especially with platforms like ph laro club offering so many options. Registration seems straightforward too, good for accessibility!
I’ve been playing on abc8casino for a little minute. Definitely worth a try. Site looks pretty nice! And so far so good. abc8casino
Heard whispers about Code78win? Let me tell ya, it’s been catching my eye lately. Gotta check them out and see what the buzz is all about! Is anyone else playing there? code78win
That analysis was spot on! Seeing teams adapt strategies is what makes esports so exciting. Thinking of trying some casual gaming too – heard good things about jlboss login and their easy setup. Great read!
79okvip, bit of a VIP feel about it. Found some higher limit tables which is always a plus. If you’re feeling flush, have a look here: 79okvip
23Win01Bet, straight up, the website looks clean and modern. Easy to navigate on my phone. They have a good range of casino games, and even some esports betting, which is cool. Overall, a solid experience. Check it: 23win01bet
It’s so important to remember gaming should be fun, not a source of stress. Seeing platforms like 99win Club offer diverse games is great, but always play responsibly! Check out 99win login for options, and set limits beforehand. 😊
Alright, betvn1vip, let’s see what you got! Gave it a whirl, and it’s not bad, not bad at all. Good selection. Could use a little something extra, but overall, I’m feeling it. You might dig it too! betvn1vip
Alright, Welcometoee88… Let’s see. Definitely a slick-looking site. Got a decent vibe. Tried my luck on some slots and actually hit a small win, so no complaints there (yet!). Navigation’s pretty good too, easy to find what you’re looking for. Give it a whirl if you’re feeling lucky: welcometoee88
Struggling with that WinPH5 login? Been there, man. Make sure you typed everything right. If not, contact support. Good luck! Need help? Go to winph5 login
Plot777 is getting some buzz around here. I heard it has some nice features! See what it is about plot777 at plot777loginregister.com.
Looking into ‘phdream 8’. Seems interesting! Anyone have experience with it? Hit me with your honest opinions. Learn more about phdream 8: phdream 8
Dhoni88bet? Named after the legend himself! Gotta give it a try just for that. Hoping for some sixes and fours. May luck be on my side! Head over to dhoni88bet
Checking out bjbaji7live. Live games, you say? That’s where the real action is. Gonna see if they’ve got a good selection and some decent dealers. See what’s happening at bjbaji7live
Downloaded the 599betapp. Seems to be working smoothly. I’ll give it a thorough road test. Gotta test its speed and fairness! Download 599betapp at 599betapp
PhDream11Login makes it easy to jump right in. Quick and simple login process. Definitely worth checking out if you’re into this stuff phdream11login.
Keep hearing about PHJili! Gotta give it a try soon. Seems like everyone’s having a blast on there phjili. Lets go!
Svv3888? Alright, I’m intrigued. I’ll bite. Let’s see what this is all about svv3888. Give it a shot if you’re feeling adventurous.
Опытные специалисты занимаются сбор базы для хрумера https://www.olx.ua/d/uk/obyavlenie/progon-hrumerom-dr-50-po-ahrefs-uvelichu-reyting-domena-IDXnHrG.html, чтобы обеспечить высокую эффективность работы.
brxbetbr has a decent selection of betting options! Been having fun checking it out. Worth a look!
Looking for ‘rồng bạch kim miễn phí’? I’ve been using Rongbachkimnet, and it works pretty well for me. Can’t hurt to give it a shot for rồng bạch kim miễn phí: rồng bạch kim miễn phí
Good luck to everyone playing the Bạc Liêu lottery today! I’m hoping someone wins big! I plan to check xosobaclieu.info for tonight’s results. Find the results here: xổ số kiến thiết bạc liêu hôm nay
Heard about juwa6 and decided to try it out. Not disappointed! Pretty nice selection of games and easy to use. Check juwa6 out at juwa6
Yo, check out 777sxgame. Their interface is smooth, and the games load quick. Been having some good runs lately. Give 777sxgame a look, you might get lucky!
Alright, listen up! If you’re trying to get into 777sxonlinelogin, it’s pretty straightforward. Just follow those steps and boom! Game time. I hope they fix some of those minor bugs soon. Login with 777sxonlinelogin.